[wpbread]
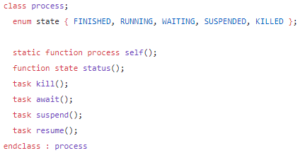
SystemVerilog defines a built-in class “Process” that allows one process to access and control another process once it has started. It allows users to define variables of type process and safely pass them through tasks. It is powerful technique of fine-grain process control. The process class cannot be extended. Object of type process is created automatically when processes are spawned, it’s illegal to call new to create object.

Table of Contents
Class methods
Following methods are provided to control the processes,
- self () – returns a handle to the current process, that is, a handle to the process making the call.
- kill () – terminates the given process and all its sub-processes.
- await () – allows one process to wait for the completion of another process.
- suspend () – allows a process to suspend either its own execution or that of another process.
- resume () – restarts a previously suspended process.
- status () – returns the process status, as defined by the state enumeration:
— FINISHED Process terminated normally.
— RUNNING Process is currently running (not in a blocking statement).
— WAITING Process is waiting in a blocking statement.
— SUSPENDED Process is stopped awaiting a resume.
— KILLED Process was forcibly killed (via kill or disable).
Example-1: Wait for process1 to be completed before starting process2
					module top;
  process p1, p2;

  initial begin
    fork
      begin
        p1 = process::self();
        $display($time," PROCESS1 Started");
        #10
        $display($time," PROCESS1 Completed");
      end
      begin
        p2 = process::self();
        p1.await();
        $display($time," PROCESS2 Started");
        #10
        $display($time," PROCESS2 Completed");
      end
    join_any
    $display("==== After join_any ====");
    #100 $finish;
  end
endmodule
Run_on_EdaPlayground
Simulator Output:
0 PROCESS1 Started
10 PROCESS1 Completed
==== After join_any ====
10 PROCESS2 Started
20 PROCESS2 Completed
Here,
process p1, p2;: This line declares two process objects named “p1” and “p2.”
fork: This keyword starts a concurrent block where you can define multiple processes that will execute concurrently.
a. Inside the fork, there are two separate begin blocks. Each block represents a separate process.
b. p1 = process::self();: This line assigns the current process to the variable p1. It’s essentially obtaining a handle to the first process.
c. $display($time," PROCESS1 Started");: This line displays a message indicating that “PROCESS1” has started, along with the simulation time ($time) when it starts.
d. #10: This delay statement causes a 10-time unit delay.
e. $display($time," PROCESS1 Completed");: After the delay, this line displays a message indicating that “PROCESS1” has completed.
f. The second begin-end block is similar but corresponds to “PROCESS2.” It assigns the current process to the variable p2, displays messages for the start and completion of “PROCESS2,” and also includes a 10-time unit delay.
g. p1.wait(): This will block execution of PROCESS2 until PROCESS1 not completes.
join_any: This keyword specifies that the code following it should wait for either of the two processes, “p1” or “p2,” to complete. Whichever process completes first will allow the code to continue executing.
Example-2: Simple code to show how different Process methods work.
					module top;
  process p1, p2;

  initial begin
    fork
      begin
        p1 = process::self();
        $display($time," PROCESS1 Started");
        #10
        $display($time," PROCESS1 Completed");
      end
      begin
        p2 = process::self();
        $display($time," PROCESS2 Started");
        #20
        $display($time," PROCESS2 Completed");
      end
    join_none
    $display($time," ==== After join_none ====");
    #5 $display($time," p1.status=%0d, p2.status=%0d", p1.status(), p2.status());
    p2.suspend();
    $display($time," P2-> SUSPENDED");
    $display($time," p1.status=%0d, p2.status=%0d", p1.status(), p2.status());
    p1.await();
    $display($time," P1-> FINISHED");
    $display($time," p1.status=%0d, p2.status=%0d", p1.status(), p2.status());
    p2.resume();
    $display($time," P2-> RESUMED");
    $display($time," p1.status=%0d, p2.status=%0d", p1.status(), p2.status());
    #5 if(p2.status()!=process::FINISHED) begin
      p2.kill();
      $display($time," P2-> KILLED");
    end
    $display($time," p1.status=%0d, p2.status=%0d", p1.status(), p2.status());

    #100 $finish;
  end
endmodule
Run_on_EdaPlayground
Simulator Output:
0 ==== After join_none ====
0 PROCESS1 Started
0 PROCESS2 Started
5 p1.status=2, p2.status=2
5 P2-> SUSPENDED
5 p1.status=2, p2.status=3
10 PROCESS1 Completed
10 P1-> FINISHED
10 p1.status=0, p2.status=3
10 P2-> RESUMED
10 p1.status=0, p2.status=2
15 P2-> KILLED
15 p1.status=0, p2.status=4
Explanation:
In summary, this SystemVerilog code demonstrates the use of processes and various process control methods such as suspend, resume, await, and kill. It also displays the status of the processes at different points in their execution.
process p1, p2;: This line declares two process objects named “p1” and “p2.”
p1 = process::self();: This line assigns the current process(first begin-end) to the variable p1.
#10: This delay statement causes a 10-time unit delay.
p2 = process::self();: This line assigns the current process(second begin-end) to the variable p2.
#20: This delay statement causes a 20-time unit delay.
join_none: This keyword specifies that the code following it should not wait for any specific process to complete. It allows both “PROCESS1” and “PROCESS2” to execute concurrently.
#5 $display($time," p1.status=%0d, p2.status=%0d", p1.status(), p2.status());: This line displays the status of both “p1” and “p2” processes. The status can be one of the predefined constants like process::RUNNING, process::SUSPENDED, or process::FINISHED.
p2.suspend();: This line suspends “PROCESS2” using the suspend method, which pauses the execution of “PROCESS2.”
$display($time," P2-> SUSPENDED");: It displays a message indicating that “PROCESS2” has been suspended.
$display($time," p1.status=%0d, p2.status=%0d", p1.status(), p2.status());: This line displays the updated status of both “p1” and “p2” after suspending “PROCESS2.”
p1.await();: This line uses the await method to make “PROCESS1” wait until it is explicitly finished or resumed by another process.
p2.resume();: This line resumes “PROCESS2” using the resume method, allowing it to continue execution.
#5 if(p2.status()!=process::FINISHED) begin p2.kill(); $display($time," P2-> KILLED"); end: This block checks if “PROCESS2” is not already in the “FINISHED” state (it means it was not terminated before). If not, it kills “PROCESS2” using the kill method. The code also displays a message indicating that “PROCESS2” has been killed.

Good example